Designing a functional kitchen in a tight van requires strategy. Every inch matters, and thoughtful layout choices turn cramped corners into useful workstations. Professionals like Rover Vans show that modular storage, clear work zones, and intentional appliance choices help make big gains in perceived space.
Whether you’re converting for full-time travel or short trips, prioritizing essentials improves workflow and comfort. A compact cooking area can support elaborate meals or quick coffee routines without taking over the living room.
Focus on flow and multifunction elements. When the kitchen setup centers on accessibility and movement, even the smallest kitchens feel open. This approach keeps the camper kitchen a highlight of van life rather than a daily frustration.
Understanding the Philosophy of Compact Cooking
A deliberate mindset makes compact cooking less about sacrifice and more about smart selection. The philosophy centers on using only the tools that match a traveler’s daily habits. This keeps the living area open and focused.
Start by deciding whether they will prefer to cook inside or to use an outdoor setup. That choice shapes the overall layout and equipment list.
Experts advise planning the design around electrical, water, and ventilation systems. Aligning the electrical panel, fresh and grey water runs, and vents avoids retrofits and improves safety.
Disciplined appliance selection matters. When they define their cooking style early, they avoid filling the van with items that rarely get use. A clean, intentional setup supports longer trips and easier maintenance.
- Match tools to daily meals and routines.
- Decide indoor vs outdoor cooking first.
- Design around utilities for safety and longevity.
Essential Small Camper Kitchen Ideas for Maximum Functionality
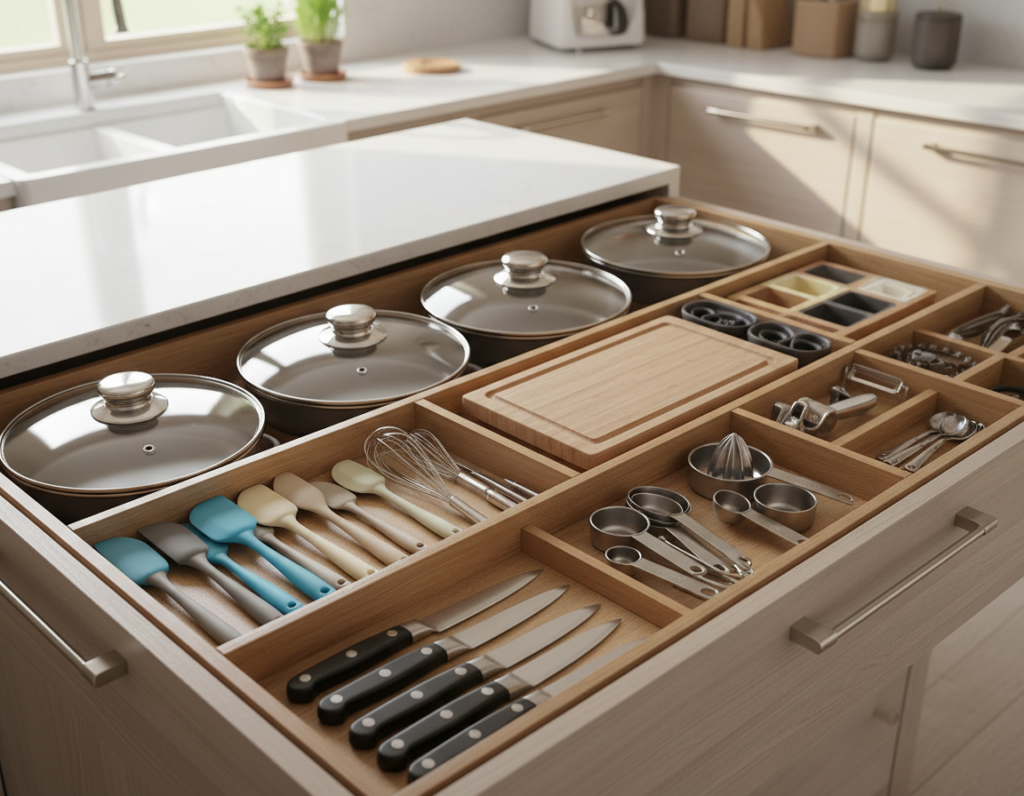
Thoughtful fixtures and smart mounts can transform narrow counters into efficient work zones. The goal is to keep the prep area open and tools secure while on the road. That focus boosts overall functionality and reduces clutter.
Magnetic Wall Storage
Install a magnetic strip on a vertical panel to hold knives, tongs, and metal utensils. This saves drawer space and keeps the counter clear from loose tools that might rattle during transit.
The strip also makes it easy to grab a utensil without moving other items. For safety, choose a strong, certified magnetic mount and place it away from controls and vents.
Collapsible Dishware
Collapsible plates and bowls fold flat to free up storage. Using stackable, flexible pieces lets the build hold more essentials without bulk.
A high-quality cutting board that fits over the sink is one of the best kitchen ideas for increasing prep area. It creates additional counter space and keeps the board accessible without shifting gear.
- Use magnetic strips to protect drawers and secure tools.
- Choose a sink-fit board to expand the counter when needed.
- Prefer collapsible dishware to maximize storage in a compact camper kitchen.
Evaluating Your Personal Cooking Style
A clear view of daily habits guides every design choice. They should list common meals and how often they cook to decide gear and layout.
Ask whether a Dometic portable stove will cover quick meals or if a larger, fixed stove is needed for elaborate cooking. That decision affects counter planning and ventilation.
Next, make sure the fridge location is set early. Choose whether a fridge sits under the countertop or slides into a drawer. Placement changes cabinet depth and service access.
- Do daily meals require a wide workspace or a compact, high-performance area?
- Will a larger stove and fridge support elaborate menus or add needless bulk?
- Does the planned design support how they live and work every day?
“Professional designers recommend mapping out your daily routine to ensure the layout supports real use.”
For a structured start, follow a simple daily routine mapping. It narrows choices and helps balance appliance size, storage, and usable space in the camper.
The Efficiency of Rear Kitchen Layouts
Locating the food prep area at the back of the vehicle creates direct access to the outdoors and more usable floor space.
Rear Hatch Considerations
Opening the rear hatch adds instant room and ventilation for safe, comfortable cooking.
When the tailgate lifts, the van gains clear floor space. That freed area is ideal for keeping the living area tidy and ready to relax.
Organize with pull-out systems. A pull-out pantry and slide-out drawers make gear reachable from the back of the van. This reduces time spent searching and keeps counters uncluttered.
Builders often add an extra counter or a slide-out prep table to handle larger meals. These features let a chef spread out without crowding the interior.
- Access the fridge and stove from the rear to avoid blocking walkways.
- Use slide mechanisms to maximize storage and maintain a tidy floor.
- Choose a layout that supports outdoor use and fast cleanup.
“A rear-facing design makes the most of hatch access and keeps the living zone clear.”
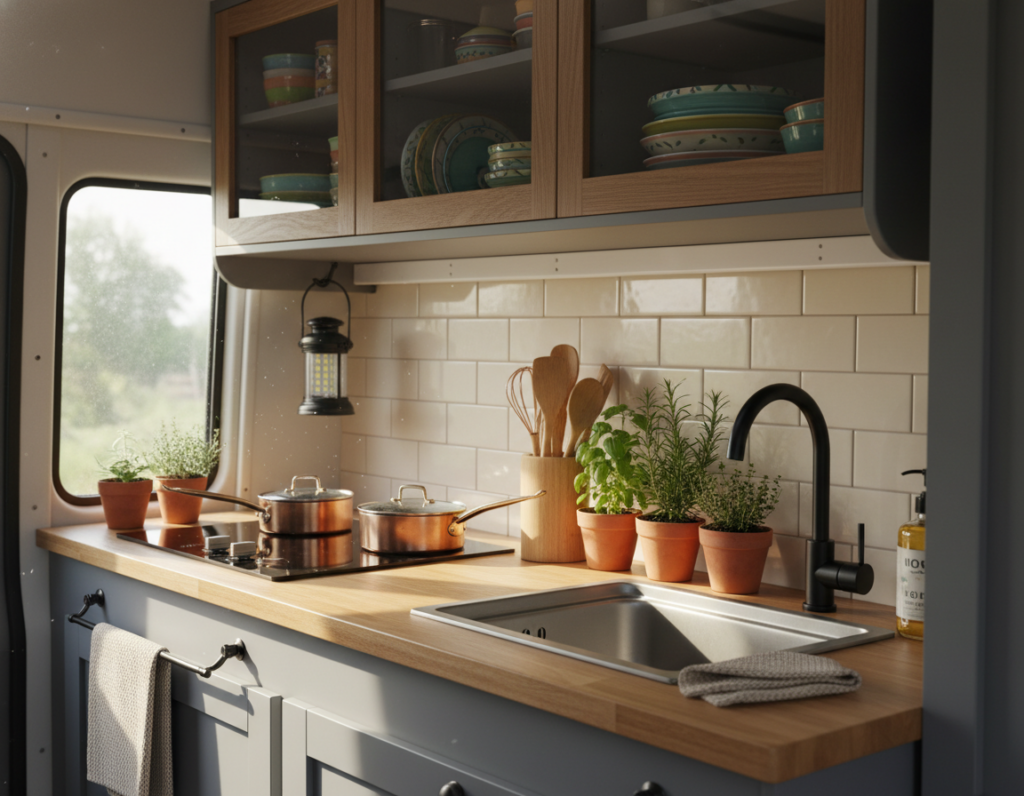
Maximizing Space with Side Kitchen Configurations
A side kitchen layout often transforms a narrow aisle into a highly functional food prep zone.
Start with a stainless steel sink and a dedicated cutting board insert. That board fits over the sink to expand usable counter space and helps keep the area tidy during meal prep.
Install tailored kitchen cabinets behind the driver seat to create a permanent, weatherproof cooking area. These kitchen cabinets store utensils, pans, and dry goods while keeping them secure on the road.
Add an extra counter extension that slides or folds out when needed. This gives safe room for chopping vegetables and staging plates without blocking the aisle.
- Include an under-counter fridge to maintain a clean, professional look while keeping food cold and accessible.
- Confirm cabinet depth so the sink has adequate clearance and there is real prep room for daily meals.
- Choose durable finishes like stainless steel and solid board inserts for longevity and easy cleaning.
“A thoughtful side kitchen layout balances storage, prep, and access to deliver the most efficient use of limited space.”
Creating a True Tiny Home Feel with Galley Layouts
A parallel galley layout gives a compact vehicle a true tiny-home vibe by lining functional elements along both sides of the aisle.
This approach uses opposing rows of cabinets and counters to frame a clear walking path. It creates a defined living zone and makes the interior feel intentional.
Bulkhead Positioning
Check the bulkhead location early to protect usable floor and avoid blocking the sliding door. Proper placement keeps the floor clear and lets one person prepare food without crowding.
Position the bulkhead so there is a comfortable work corridor. That simple choice impacts traffic flow, ventilation, and safety while cooking.
Spice Rack Integration
Install a slim spice rack on the inside cabinet door for immediate access to seasonings. This clever storage trick frees counter space and keeps spices tidy while driving.
The galley layout also supports a deep pantry and upper kitchen cabinets. Together they offer ample storage for dry goods and utensils, helping these kitchens feel larger than their footprint.
- Use opposing cabinets to create a real home-like feel.
- Reserve the center aisle for safe movement and meal prep.
- Fit a pantry and upper kitchen cabinets to keep counters clear.
The Versatility of Swivel Kitchen Modules
A swivel module turns a fixed galley into a flexible prep station that adapts to weather and layout needs. It lets users choose where to cook and keeps the living area clear when the unit swings outside.
Many Rover Vans-style units include a stainless steel sink and a compact work surface. They are built light for easy rotation and to suit a side kitchen installation on popular platforms.
Swivels free interior storage because the module rotates outside when parked. That movement creates more usable space inside and reduces clutter in cabinets and drawers.
Installers value the modular approach since one unit fits Sprinter and Ford Transit models with minor adjustments. The system keeps a functional kitchen available without permanently occupying the living zone.
“A rotating module brings outdoor cooking flexibility while preserving interior comfort.”
- Lightweight build for easy rotation
- Works with common van platforms
- Saves interior storage and maintains flow
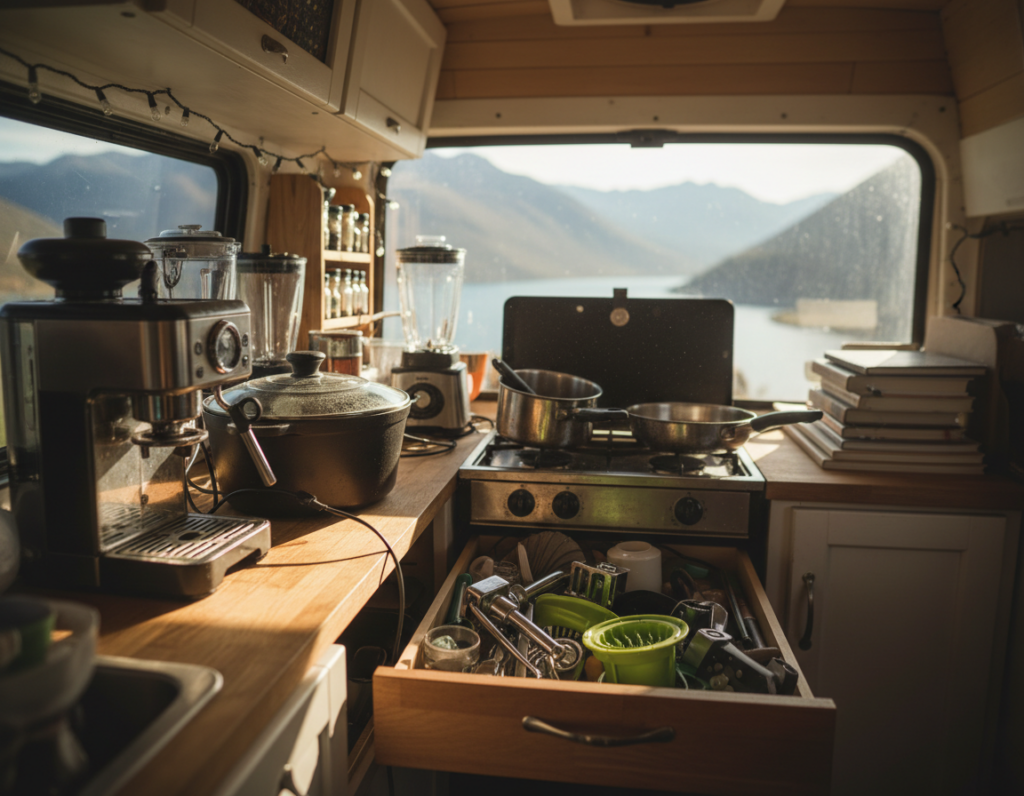
Benefits of Integrating an Outdoor Kitchen Setup
A well-designed exterior cook station changes how a van feels and functions. Moving food prep outside frees interior space and keeps grease and moisture out of the living area. That reduces odors and makes the cabin easier to maintain after messy meals.
Using an outdoor setup also increases usable space for dining and relaxing. Many owners pair a compact indoor galley with a slide-out module so they can choose where to cook based on weather and view. This hybrid approach protects interior finishes while delivering flexible functionality.
Slide-Out Drawer Mechanics
Robust slide systems matter. A 250 lb rated drawer will safely carry a stove, sink, and fridge on the road. Proper guides and locking pins keep everything secure when driving and make deployment smooth when parked.
- Choose stainless steel surfaces for durability and easy cleaning.
- Integrate secure storage and tie-downs to prevent movement.
- Combine a fixed side kitchen inside with the outdoor module for the best of both worlds.
Overall, an outdoor kitchen setup enhances the travel experience. It keeps the interior tidy, supports safer cooking, and makes meal prep by a lake or overlook more enjoyable.
Utilizing Vertical Space for Storage
Turning vertical planes into organized zones multiplies usable storage instantly. Simple wall solutions increase capacity without changing the floor plan.
Install hanging baskets, wall-mounted racks, and slim shelves above the sink or stove to keep produce and utensils off the counter. These mounts free work surfaces and make items easy to reach while driving or cooking.
They can also add narrow pegboards for pans and hooks for mugs. When designers think vertically, they turn cabinet backs and door interiors into efficient storage space.
Organize by frequency of use—place daily tools at eye level and reserve high shelves for bulk items. This method keeps the kitchen orderly and reduces time spent searching while on the road.
- Maximize every wall to expand storage capacity without larger buildouts.
- Use above-stove shelving for spices and light cookware.
- Keep a clear counter to make the camper kitchen feel more open and calm.
“Well-planned vertical storage turns tight quarters into a functional, calm cooking area.”
Clever Hacks for Countertop Expansion
In tight builds, a few clever countertop tricks can double usable work area without heavy mods. These solutions focus on making a compact kitchen function like a full kitchen when needed and tuck away cleanly when not in use.
Fold-Down Extensions
Fold-down extensions give instant extra counter space exactly when meal prep calls for it. Install sturdy hinges and a simple latch so the leaf folds out and locks solid for chopping or plating.
Choose lightweight materials—bamboo or laminate keep weight low and look good next to existing surfaces. When finished, the extension drops flat and clears the walk aisle.
Convertible Stove Covers
A convertible stove cover turns the unused burner into a reliable cutting board and staging area. A fitted board protects the stove and doubles as a prep surface, creating an effective extra counter.
Tip: Use a bamboo or laminate board sized to the cooktop. It adds both aesthetic appeal and practical utility to the camper kitchen while making cutting and prep easier without clutter.
Organizing Cabinets with Pull-Out Solutions
Pull-out systems transform deep cabinets into instant, reachable storage that saves time and reduces spills. A well-built pull-out pantry keeps jars, canned goods, and pans visible so nothing gets lost at the back of the cabinet.
Install smooth, full-extension drawers to use the full depth of a cabinet. These slides turn wasted depth into usable storage and free up counter space for food prep.
Use clear bins inside cabinet drawers to separate spices and cleaning supplies. Labels help identify items quickly while traveling and keep everything stable on bumpy roads.
- Fit a pull-out trash system under the sink to save floor space and reduce odors.
- Secure fridge and pantry items with dividers so they stay put when driving.
- Maximize depth with slide-out drawers to store pots, lids, and tools neatly.
These clever storage choices make kitchen cabinets feel larger and more organized. By planning pull-outs and clear bins, they create efficient storage space that performs well on the road and at camp.
“Pull-out systems make every inch count and keep essentials accessible without clutter.”
Selecting Lightweight and Durable Materials
A thoughtful selection of panels and finishes keeps weight low while resisting wear from vibration and moisture. This choice preserves payload and improves fuel efficiency on long trips.
Choosing Wood and Laminate Surfaces
Use plywood or aluminum framing for structural parts to cut weight without losing strength. Light frames reduce strain on the vehicle and prolong the build’s lifespan.
For the counter and visible surfaces, opt for hardwood-faced ply or high-pressure laminate. These options offer a balance of aesthetic appeal, scratch resistance, and easy cleaning.
When placing the fridge and sink, surround them with water-resistant materials. Sealed edges and marine-grade adhesives prevent swelling and delamination from spills or leaks.
- Frame: ply or aluminum for low weight and high durability.
- Surfaces: laminate for scratch resistance and fast cleaning.
- Wet zones: seal seams near the sink and fridge for long-term protection.
- Vibration: choose adhesives and fasteners rated for road use to avoid loosening.
Using quality, lightweight materials creates more usable space and reliable storage that stands up to road life. Proper choices keep the build functional and low-maintenance for many seasons of travel.
Safety Protocols for Cooking in Confined Spaces
Safe cooking starts with a plan that covers ventilation, monitoring, and secure storage. Install a carbon monoxide detector and ensure good airflow every time a propane burner or a Dometic portable stove is in use.
Never leave the stove unattended while cooking. Make sure the water system is sealed so leaks cannot reach electrical components.
Secure all food and storage items before driving. Tiedowns and latches prevent jars and pans from shifting and causing injury or damage.
Check propane hookups regularly. Inspect fittings, hoses, and valves for wear and smell checks after fueling. Routine checks reduce the risk of leaks and fire.
- Install a carbon monoxide detector and ventilate during use.
- Never leave a lit stove unattended.
- Seal water lines to protect electrical systems.
- Secure food and storage before travel.
- Inspect propane hookups often to keep the kitchen setup safe.
“Following simple safety protocols creates a secure environment where they can enjoy cooking without needless risk.”
Budgeting for Your Kitchen Design Project
Planning expenses early helps owners avoid expensive rework to the van floor and wall systems. A clear cost plan sets realistic expectations for materials and labor.
Expect a wide range: basic 2D plans can start near $150, while full 3D renderings and pro installation can exceed $3,000. They should factor in cabinets, appliances, and storage solutions when totaling the project budget.
Many travelers keep costs down by using IKEA components and modular fittings. These parts help achieve a modern look without large custom bills.
Prioritizing quality for the counter and storage areas reduces replacement and repair costs over time. Spending more on durable cabinet finishes and a solid counter pays off in years of use.
- Budget for plans, hardware, and installation separately.
- Choose durable materials where the most wear occurs.
- Invest time in the layout to save money and avoid mistakes.
“A well-planned design saves money long-term by preventing costly retrofits.”
Sourcing Professional Layouts and Components
Professionally planned layouts cut guesswork and make sure each fixture fits the van’s footprint. A clear plan avoids costly rework and saves time during installation.
They can source full modules from companies like Rover Vans that specialize in modular units for Sprinter and Ford Transit conversions. These vendors offer tested options that include a stove, sink, and integrated pantry.
For custom work, use tools like SketchUp to visualize the kitchen layout and how drawers and storage will function. Digital mockups show clearances around wheel arches and the bulkhead so parts fit without surprises.
- Measure the interior precisely before buying components.
- Buy spice racks, pull-out drawers, and pantry organizers from reputable suppliers.
- Weigh the choice between a ready-made module and a custom design based on budget and room needs.
Professional planning combined with thoughtful sourcing delivers clever storage that supports real work on the road. This approach helps the build feel organized and reliable for years of travel.
Conclusion
The right build brings personal style and lasting comfort to any kitchen. Thoughtful choices in layout and durable finishes help these kitchens support real-life cooking and travel routines. Simple adjustments often deliver the biggest gains in daily use.
Whether you’re aiming for a galley setup or a slide-out module, practical ideas that boost organization improve both flow and functionality. Add a spice rack, a fold-down counter, or a pull-out pantry to change how the space will feel on the road.
Focus on smart materials and clear planning to make big improvements. With a concise plan, they’ll enjoy a reliable kitchen layout that matches how they cook and live while traveling.