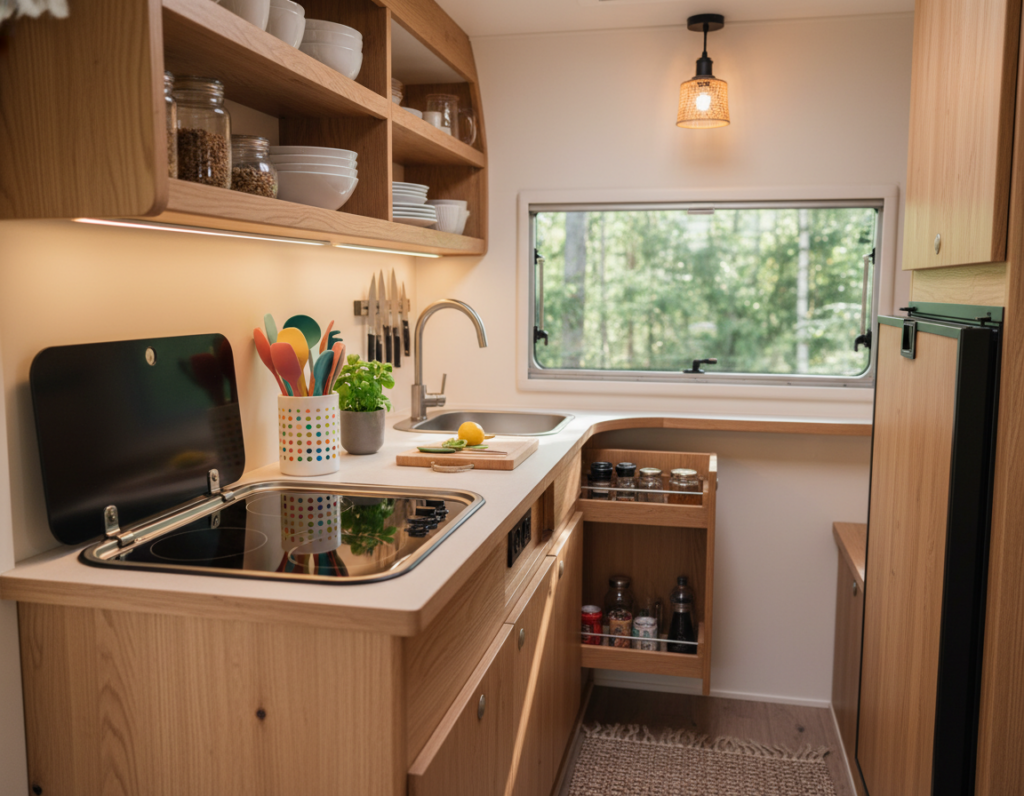
Designing a functional kitchen in a camper starts with a clear plan for every inch of usable space. A smart layout turns tight quarters into an efficient prep area and dining spot. Cassandra Thurston, a New Jersey designer, stresses that materials must stand up to daily use in a home.
Durable countertops and the right cabinet mix keep gear organized and within reach. Choosing wood accents, thoughtful shelves, and a compact table will shape the look and flow. Light and color choices make the room feel larger and more inviting.
When there is a lot of gear, planners must place each cabinet and shelf to maximize area and movement. A good floor plan sets where the table goes and how people move while cooking. The best small kitchen ideas balance aesthetic and function so the camper truly feels like home.
Maximizing Efficiency in Tiny Camper Kitchens
Every inch in a camper must pull double duty to keep cooking fast and tidy. A well-planned layout pairs multi-functional furniture with purposeful storage so meal prep flows without wasted motion.
Use an island that doubles as prep surface and dining table. That piece adds storage and seating without taking extra area. Classic materials such as white oak and white marble lend a timeless look while staying practical, as Emily Henderson recommends.
Design for speed: place cabinets and shelves near work zones so tools are always reachable. Slide-out boards and fold-down tables save time and keep the room uncluttered.
- Prioritize counter space that converts into prep or dining.
- Choose light color and reflective finishes to make the space feel larger.
- Use wood accents on the floor or trim to add warmth.
“Functionality beats excess; in tight quarters, every cabinet must earn its place.”
Essential Small Kitchen Counter Ideas for Compact Living
A smart choice of surface improves workflow and protects the limited area in a camper or tiny home. This brief guide compares practical tops that fit tight footprints while keeping style and function balanced.
Butcher Block Versatility
Butcher block is affordable and on trend. It gives a warm wood look and serves as a built-in cutting surface for fast prep.
Why it works: durable for daily use, easy to sand and refinish, and pairs well with open shelves and warm flooring.
Stainless Steel Durability
Stainless steel brings commercial strength to a compact countertop. It resists heat and heavy use, making it ideal for serious cooking in a small kitchen.
- Soapstone and marble offer stone alternatives—soapstone is low-maintenance and heat-resistant; marble adds luxury but needs more care.
- Add a tile backsplash to protect walls and introduce color without crowding the room.
- Consider an island or bar if a table would free up cabinet and prep area for dining and storage.
“Choose materials that support daily tasks and brighten the room with light finishes.”
Selecting Durable Materials for Mobile Environments
Road-ready surfaces must resist vibration, temperature swings, and spills to stay useful over miles of travel.
Concrete countertops are a standout choice for a mobile cooking area. They withstand knocks and heat and deliver a modern, industrial look that lasts when sealed and maintained.
Stone and quartz also hold up well on the road. Unlike soft marble, these options resist chips and staining better in a moving home.
Secure installation matters. Fasten tile backsplashes, cabinets, and any wood trim to prevent loosening. Use flexible sealants where panels meet to tolerate motion.
- Use reflective materials and light colors to open the space and boost natural light.
- Design storage under an island or behind a backsplash to use every inch of area.
- Prioritize surfaces that clean easily to keep the room tidy during travel.
“Choose materials that feel like home and perform like a workshop.”
The Benefits of Waterfall Edges in Limited Square Footage
A waterfall edge makes a compact layout read as one continuous surface from top to floor. This technique wraps the slab over the side of the cabinet or island, creating an unbroken plane that reduces visual breaks in the room.
Visual continuity matters. Using a single material such as marble or quartz for the countertop and waterfall edge helps the space feel cohesive. It ties the backsplash, cabinets, and floor together for a calm, upscale look.
Visual Continuity Benefits
A waterfall edge simplifies sight lines. In a small kitchen, clean lines minimize clutter and make the room seem larger. An island with a waterfall finish becomes a focal point for dining and prep without adding visual noise.
- Continuous materials boost the sense of area and cohesion.
- Stone finishes resist wear and keep the design practical for travel and daily use.
- Check cabinet and floor levels before installation to ensure a perfect fit.
“A waterfall edge turns a functional surface into a design statement that expands the space.”
Integrating Multi-Functional Furniture
Multi-use furniture converts tight layouts into flexible living zones that adapt to cooking, work, and dining. This approach lets a single piece serve multiple roles so the room works harder without feeling crowded.
Convertible Islands
Convertible islands fold from prep surface to dining table or desk. A rolling island can move into the center of a studio to become a table for four or six.
Choose durable materials like wood or metal and include hidden storage for utensils and pans. Ensure the island does not block access to cabinets or the backsplash area.
Desk Transformations
A pull-out desk or a drop-leaf extension turns an island into a daytime workstation. When the work day ends, the surface clears for meal prep or a bar-style serving area.
Dining Table Hacks
Folding tables and nested benches tuck away to free floor space. Integrating a slim table into an island saves the room and keeps sight lines open to the living room.
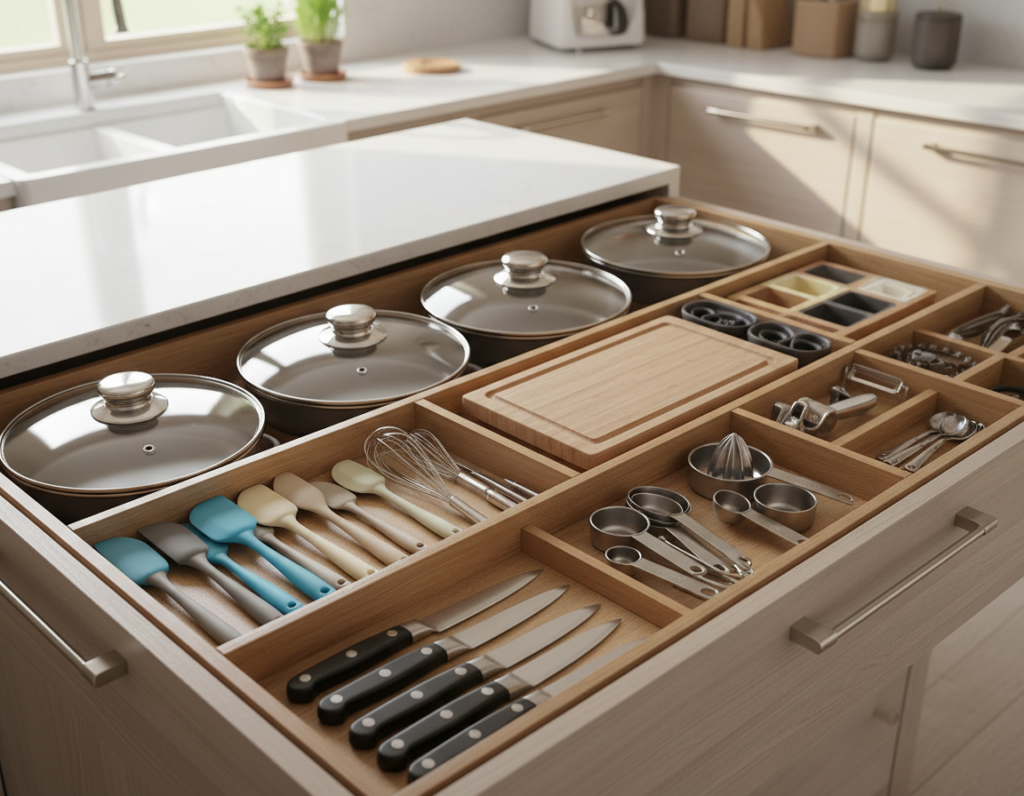
- Maximize storage with hidden drawers and shelving under the island.
- Match color and light to create a unified look across the area.
- Pick high-quality materials to withstand travel and daily use.
“Multi-functional furniture is the simplest way to get more from every square foot.”
Utilizing Vertical Space for Storage
Going vertical unlocks surprising storage without eating into valuable floor area. Wall-mounted shelves and a metal spice rack free up counter space and keep essentials within reach.
Many small kitchen layouts use the backsplash as a mounting surface for hooks, bars, or magnetic strips. A tile or metal strip near the backsplash holds utensils and knives safely.
Wood shelves add warmth and sturdy storage for plates or glassware. Light color on walls and cabinets helps vertical systems blend in and keeps the room feeling open.
- Install shelves above the island or table to leave the floor clear.
- Use secure anchors so items stay fixed while driving.
- Plan storage from floor to ceiling to maximize every available area.
“A well-organized design uses vertical storage to keep the island and table clear, making the room feel much more spacious.”
Creative Sink Placement Strategies
Placing the sink in an unexpected spot can unlock valuable storage and boost workflow. A rotated or re-positioned basin changes how the work triangle flows and how cabinets are used.
Rotating sink orientation is one of the simplest moves. Velinda Hellen rotated a standard sink sideways to reclaim half of the base cabinet for storage in her 49-square-foot space.
Rotating Sink Orientation
Turning the sink sideways frees room on the countertop and frees up deep drawers below for pans and trays. A wall-mounted faucet pairs well with this layout to avoid extra deck holes.
- Maximize storage: sideways sinks create usable cabinet volume under the basin.
- Keep workflow smooth: place the sink near the island or table to link prep and dining zones.
- Design touches: a tile or wood backsplash and light color finishes make the area feel intentional and bright.
“A well-planned sink lets the cabinets, floor plan, and countertops work together for efficient cooking.”
Implementing Reflective Surfaces to Enhance Space Feel
Shiny surfaces and glazed tiles redirect light, making compact layouts feel airy and open. Glazed Zellige tiles help bounce daylight into corners so a small kitchen gains depth and a brighter space feel.
A glossy backsplash can diffuse window light across the room and reduce harsh shadows. Reflective cabinet fronts or a well-placed mirror create the illusion of extra area without changing the floor plan.
When planning a kitchen design, consider how light hits the island, the floor, and work surfaces. Balance reflective finishes with warm wood accents and light color choices to keep the look inviting rather than cold.
- Use glazed tiles or mirrors to amplify natural and artificial light.
- Pick glossy cabinet faces sparingly to avoid glare and maintain warmth.
- Coordinate color and wood tones so the room feels cohesive and safe to work in.
“Reflective materials expand perception; good placement makes a tiny layout function like a larger room.”
The Role of Open Shelving in Small Kitchens
Replacing bulky upper cabinets with open shelves can change how a room breathes. Brady Tolbert removed one upper cabinet and used shelves to make his small kitchen feel more open and connected to the rest of the trailer.
Maintaining Visual Flow
Open shelving removes visual bulk and maintains a line from the island to the floor. That continuity helps the whole design read as one calm plane.
Use matching wood tones and a light color on the wall to keep sight lines smooth. Check the backsplash behind shelves; a subtle tile or paint can act as a backdrop that ties the look together.
Styling Open Shelves
Keep frequently used items accessible. Display favorite dishes, a handful of jars, and a small plant to add warmth without clutter. When there is a lot of stuff, pair shelves with closed cabinets for hidden storage.
- Show a limited number of plates and glassware to avoid overcrowding.
- Group items by color or use to enhance kitchen feel.
- Store daily tools near the prep zone so cooking stays efficient.
For a quick reference, see this open shelving guide to balance style and storage in a compact layout.
Customizing Countertops with Rental-Friendly Solutions
Renters can update a leased surface with low-commitment finishes that make a big visual impact. Contact paper is a budget-friendly option that usually costs under $50 and is simple to apply and remove.
DIY vinyl floor tile is another inexpensive upgrade that modernizes a rented layout for under $50. A fresh backsplash panel or peel-and-stick tile can change the room’s feel without permanent work.
Small swaps to cabinets or an island—like new handles, peel-on veneers, or a wrap of faux wood—refine the overall design and the visual look of the space.
- Use removable films on the countertop to protect surfaces and experiment with color or wood tones.
- Pick light finishes to boost perceived area and reflect light.
- Always clear changes with the landlord before painting or replacing fixtures.
“Temporary treatments let renters personalize their area and restore it easily when they move.”
Incorporating Pull-Out Prep Surfaces
A retractable prep shelf turns unused cabinet depth into a practical work zone. This approach adds temporary workspace without reducing permanent counter space or obstructing traffic near the island or floor area.
Slide-out cutting boards marry form and function. They tuck into cabinets or the island and slide out when needed for cutting, plating, or serving as a quick bar surface. Using wood for these surfaces adds warmth and cleans easily with light maintenance.
Slide-Out Cutting Boards
Designers recommend planning pull-outs near the main work triangle so storage and countertop tools stay within reach. Sturdy slides and secure mounts keep the surface stable while in use.
- Hidden prep surfaces free up counter space and keep clutter off the backsplash.
- They often live in cabinets, preserving valuable storage for pans and cutting boards.
- When placed near the island, a pull-out can double as a casual bar or dining ledge.
Practical tip: choose light color finishes around the pull-out to make the area feel larger and to coordinate with countertops and wood accents.
“Well-planned pull-outs let every inch of storage support cooking, serving, and cleanup.”
For compact layouts that need smart surface solutions, see this countertop design guide to pair pull-outs with durable materials and secure cabinetry.
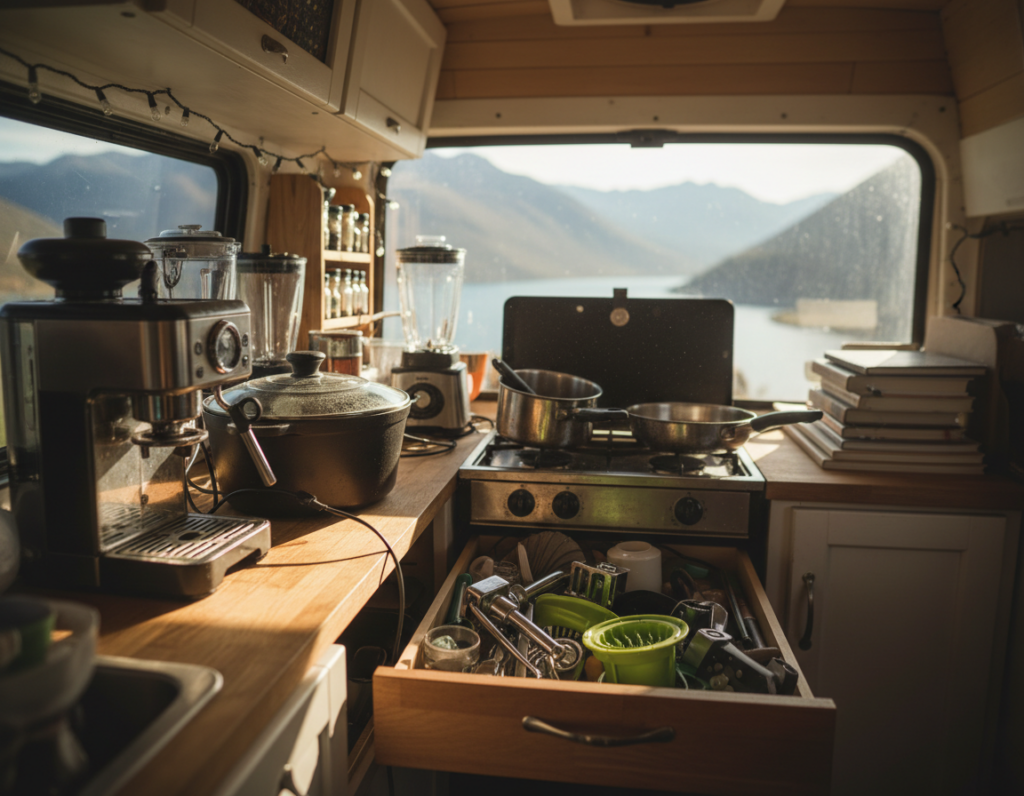
Managing Clutter with Built-In Trash Chutes
A built-in trash chute keeps prep moving by letting cooks slide scraps away without breaking their rhythm. This feature improves workflow and keeps the work area tidy during meal prep.
Many compact kitchen designs tuck a chute into the countertop or island so waste goes straight into a hidden bin. That placement keeps the backsplash and surface clear and reduces trips to a separate trash can.
When planning placement, designers consider cabinet layout and floor access to make emptying simple. Using durable materials like wood or stone around the chute keeps the installation sturdy.
- Built-in chutes free up counter space and improve cleaning speed.
- Seal the opening well and choose models that are easy to wipe down for hygiene.
- Integrate the chute with cabinet storage so the bin is hidden but reachable.
“A well-placed chute makes a compact kitchen feel larger by keeping surfaces clear.”
Balancing Aesthetics and Functionality
A thoughtful layout blends pleasing finishes with hard-working surfaces to keep daily tasks effortless.
Orlando Soria showed how two-tone cabinets can lift the aesthetic while grounding the layout. This trick makes the room feel lighter and gives visual zones for prep and storage.
Choose a durable countertop and a low-maintenance backsplash to protect surfaces and keep cleaning quick. These choices affect both the look and the utility of the space.
Plan the island and cabinets so they store essentials without blocking movement. A clear floor plan preserves the work triangle and helps everyone move between prep, cook, and wash areas.
Durable materials mean the area stays a practical place to cook and live. When aesthetics and functionality match, a compact layout becomes a pleasant home for everyday use.
“Focus on finishes that serve daily life; beauty must perform.”
Choosing the Right Color Palette for Airy Kitchens
A cohesive color scheme helps the island, cabinets, and countertop read as one plane so the room feels larger. Neutral tones reflect light and simplify sight lines, making the overall space feel open and calm.
When pairing a pale countertop with a matching backsplash, keep the floor and cabinets in the same family to avoid visual breaks. Light cabinet finishes make storage look less heavy and help a modest layout maintain a fresh kitchen feel.
Linking the island and dining area with a consistent palette creates flow. This way, transitions between prep, cook, and dining feel intentional and roomy even when gear fills cabinets.
- Use warm neutrals or cool whites to reflect natural light.
- Match one accent hue across textiles or hardware to unify the room.
- Test paint and surface samples beside windows before finalizing.
“A light, consistent palette turns a tight plan into a bright, welcoming place to cook and dine.”
Optimizing Lighting for Better Visibility
Layered lighting transforms a tight cooking area into a bright, efficient workspace. Minimalist spotlights and pendant lamps focus attention where it matters most.
Task lighting over the countertop and island keeps prep safe and precise. Task fixtures reduce shadows while chopping and cleanup.
Ambient light softens the room and links the prep area to the living room and dining table. A warm overall glow makes the layout feel more open.
- Use spotlights to highlight the island or bar for a professional look.
- Pick light-colored cabinets and a bright backsplash to reflect light and enlarge the view.
- Place pendants over the dining table and worktops to balance function and style.
Good fixtures improve functionality and the overall design. With the right plan, a small kitchen or camper layout becomes easier and more enjoyable to use.
Conclusion
Focusing on workflow and quality finishes helps a travel-ready cooking space feel like home. Thoughtful layout and resilient materials make it easier to cook and clean while on the move. Placing storage near work zones and using vertical systems saves valuable floor area and reduces visual clutter.
Durable choices for the countertop and backsplash protect surfaces and speed daily tasks. Multi-functional furniture and secure installation mean fewer repairs and less wasted time. For practical organizing tips that complement these finishes, see this minimalist home organization guide.
With good planning and quality materials, a compact kitchen becomes the heart of a mobile home. Protect the floor and choose finishes that last so every trip spends less time on maintenance and more time enjoying the road.